Hey yo. I got aske for this tutorial so here it is. Showing you all the steps to get your model from 3ds Max to San andreas.
.
Original models from Infinity Ward,Capcom,Electronics Arts, Microsoft, Ubisoft and Treyarch,Xnalara and tombraider forums Users(rexil,Oocrofty,fullmon etc)Valve,Gmod and all developers that have created those models! I don't own any credits for those models!!!!
Mostrando postagens com marcador Tutorials. Mostrar todas as postagens
sábado, 12 de dezembro de 2015
[SA||2015]Tutorial: Exporting maps/models/objects from 3ds Max to San an...
Hey yo. I got aske for this tutorial so here it is. Showing you all the steps to get your model from 3ds Max to San andreas.
quarta-feira, 6 de maio de 2015
TUTORIAL: How to resize skins properly
Hello everybody
I got this tutorial asked recently because people can't resize peds/skins properly.
I took a look in everywhere , searching for a tuto when i wanted to resize my models but i didn't find one. So workin' on 3ds max , i discovered this way. If you have another and easier , share with us.
You need:
- 3ds Max
- Skin/model Rigged
I got this tutorial asked recently because people can't resize peds/skins properly.
I took a look in everywhere , searching for a tuto when i wanted to resize my models but i didn't find one. So workin' on 3ds max , i discovered this way. If you have another and easier , share with us.
You need:
- 3ds Max
- Skin/model Rigged
After you got your model done(rigged ,all texturies applied and exported to get workin' ingame) open
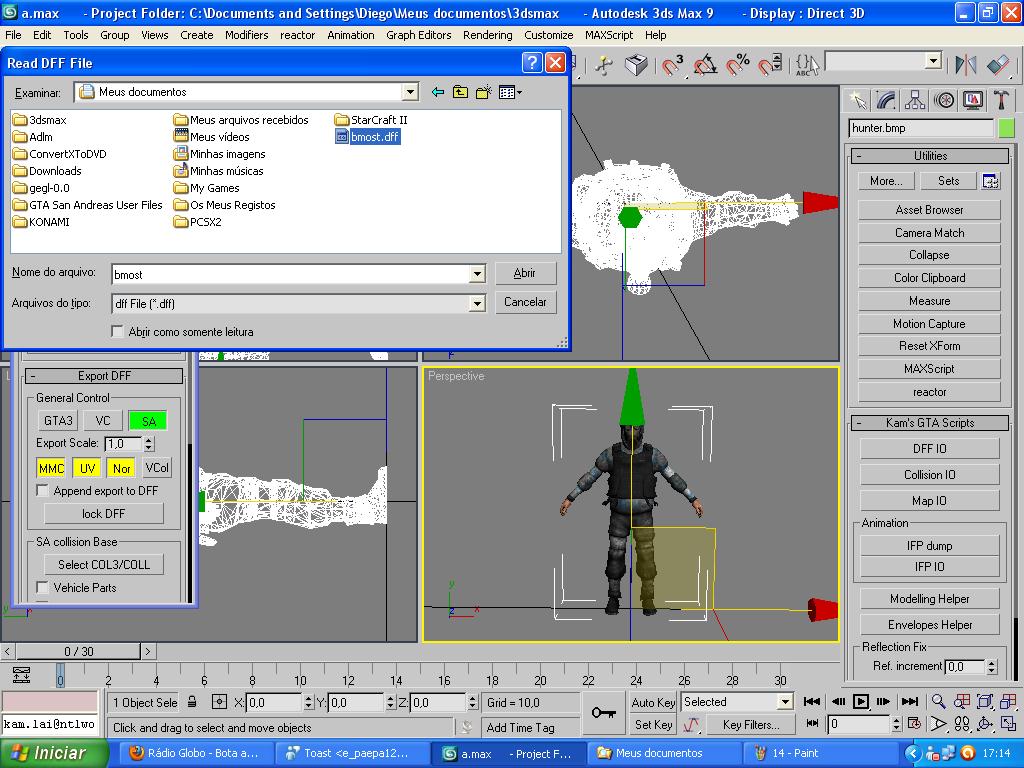
3ds Max , run kam script,click on DFF IO, check the "letter a option" and import you skin:
Now that you have your model imported, click on "select by name"

A new window will pop up,with all bones names

Select your model (Skin_mesh) and all bones except the root one:

Click on "Select and Uniform Scale" and resize your model(to a bigger one or smaller one, is this case i scaled it bigger)


Now,you have your model and all bones (except the root one) rescaled.Keep your model and bones select ,click on "select and move" and move them back on the "Z axis"(the blue one)

Now, you have your model plus all other bones moved back and the root bone on the same default position.Your model is ready to be exported, check "skip col" option and click on "bone/Skin export" and select a name for the model , Bmost for ex and try it in game.

IMPORTANT:
If you want to make a smaller one, you move it foward on the Z axis. How much you'll move it back or foward depends on how much you resize it. Biggar and smaller, more you move it.
Enjoy
3ds Max , run kam script,click on DFF IO, check the "letter a option" and import you skin:
Now that you have your model imported, click on "select by name"
A new window will pop up,with all bones names

Select your model (Skin_mesh) and all bones except the root one:

Click on "Select and Uniform Scale" and resize your model(to a bigger one or smaller one, is this case i scaled it bigger)


Now,you have your model and all bones (except the root one) rescaled.Keep your model and bones select ,click on "select and move" and move them back on the "Z axis"(the blue one)

Now, you have your model plus all other bones moved back and the root bone on the same default position.Your model is ready to be exported, check "skip col" option and click on "bone/Skin export" and select a name for the model , Bmost for ex and try it in game.

IMPORTANT:
If you want to make a smaller one, you move it foward on the Z axis. How much you'll move it back or foward depends on how much you resize it. Biggar and smaller, more you move it.
Enjoy
segunda-feira, 15 de setembro de 2014
My Tutorial: How to fix Alpha channel issues for new Peds( Specially hairs)
Hey guys
Who make mods for SA know how bad SA's engine handles textures alpha textures.Those models who have complex alpha textures for hair , beards , lashes and etc look "bugged", with some "invisible" , see through parts. After 2 years searching , reading tons of articles, forums etc and tryin' tons of tricks , this is the one you'll have the best result.
I'll teach you how to solve this problem ( at least for most of the models because it didn't work for a small percentage. I didn't test it using z modeler but it should work as well.
You need:
- TXD Workshop
- 3ds Max
Select your model, Editable mesh and element
Drag and drop your textures to material editor to apply the textures to your model like i'm doing.
Important: Don't apply your hair texture now, Leave the hair textures to the final part!
The face texture
The body texture
The id texture
Ok, now as you can see my model has 4 textures
All textures are applied to the model except the hair one as you can see.
Now select your hair mesh
Drag your hair texture and apply it to your model
Now your model has all textures applied, mark skip col and click on "bone/skin export" and export your model.After that import your model again
The textures won't be applied anymore. Select your model , click on editable mesh and element
Select your hair mesh again and click on "datach"
After that delete the others meshes and keep the hair one
Also, delete all bones:
Select the hair mesh ,click on editable mesh and element
Press crtl+a to select all polygons(you'll get your mesh red)
Now scroll down untill you see the "flip" button, click on it. The interior part will be lighter.
Now deselect all polygons and the mesh
Import you model once again
Delete all bones , keeping your flipped hair mesh and the full model you have just imported. Now this part is extremelly important. You need to atach your flipped haiar to the model, if you do the opposite your model will still be bugged in game.
Select your hair mesh
Click on "attach" button
and then click on your model
A new window will pop up, select the 1st option "Match Material IDs to Material" and click on ok
Now you'll have your model with 2 hair meshes, one flipped and another one unflipped as you can see bellow
Ok, now we need to make a trick to don't need to rig the model again.Import the model again
And you'll have 2 models. A static one that with 2 hair meshes( one flipped and another one unflipped) and one rigged model ( with only one hair mesh). Select the rigged one you just imported, click on editable mesh and vertex.You'll see all those blue dots:
Press crtl+a to select all dots, they'll become red as you can see bellow:
Next,click on "attach"
After that click on your static model . A new window will pop up: Select the first option again "Match Material IDs to Material" and click on ok
After click on ok, press the "delete" key on your keyboard . It'll deleted the old rigged model and will keep the new rigged one( this new one rigged is your old static model). You'll see only blue dots like in ths picture:
Now deselect the vertex and click on editable mesh. You model is done and we need to export it.Be sure to mark "skip col" before export it and click on bone/skin export. I replaced the older model i had( in this case bmost) as you can see bellow
Now that you exported your model, you need to make some changes on your txd file. This is the second most important part to fix the alpha bug. Your hair texture needs to be the last one in your txd file.Import all textures , except the hair one.Check this pic to see my txd file with all textures except the hair. Yours should look like this:
Select the last one and press "crtl + insert". You'll make a copy of the last one as you can see:
Double click on it and you'll see the image properties, rename it to match your hair texture and compressed it.This will make it as a DXT1 layer.
Now mark that "alpha is used" option.The alpha name will appear there automatically. It's basically your texture name with an letter "a" in the end.
After that , click ok and you'll have a new image there with "hair" name on it plus the alpha channel
Click on "import" button and you'll have a browser. Search your proper hair texture and open it.
Ok , now you have everything done and fixed. Basically what we have done was leave the hair texture be the last one in the model hierarchy and the hair texture the last one in the txd file too. Since GTA engine renders complex alpha channel for the last, everything works fine to render it properly
In this tutorial, we double the meshes ( for hairs, beards etc) to get it working good since SA can't handle double faced polygons. So doing tihs trick both side of the mesh will be rendered without bugs. Plus using the right settings on TXD file, you'll make the result even better.
Who make mods for SA know how bad SA's engine handles textures alpha textures.Those models who have complex alpha textures for hair , beards , lashes and etc look "bugged", with some "invisible" , see through parts. After 2 years searching , reading tons of articles, forums etc and tryin' tons of tricks , this is the one you'll have the best result.
I'll teach you how to solve this problem ( at least for most of the models because it didn't work for a small percentage. I didn't test it using z modeler but it should work as well.
You need:
- TXD Workshop
- 3ds Max
Open 3ds max, be sure to check that letter "a" and import your model ( in my case is one already rigged)
Drag and drop your textures to material editor to apply the textures to your model like i'm doing.
Important: Don't apply your hair texture now, Leave the hair textures to the final part!
The face texture
The body texture
The id texture
Ok, now as you can see my model has 4 textures
All textures are applied to the model except the hair one as you can see.
Now select your hair mesh
Drag your hair texture and apply it to your model
Now your model has all textures applied, mark skip col and click on "bone/skin export" and export your model.After that import your model again
The textures won't be applied anymore. Select your model , click on editable mesh and element
Select your hair mesh again and click on "datach"
After that delete the others meshes and keep the hair one
Select the hair mesh ,click on editable mesh and element
Press crtl+a to select all polygons(you'll get your mesh red)
Now scroll down untill you see the "flip" button, click on it. The interior part will be lighter.
Now deselect all polygons and the mesh
Import you model once again
Delete all bones , keeping your flipped hair mesh and the full model you have just imported. Now this part is extremelly important. You need to atach your flipped haiar to the model, if you do the opposite your model will still be bugged in game.
Select your hair mesh
Click on "attach" button
and then click on your model
A new window will pop up, select the 1st option "Match Material IDs to Material" and click on ok
Now you'll have your model with 2 hair meshes, one flipped and another one unflipped as you can see bellow
Ok, now we need to make a trick to don't need to rig the model again.Import the model again
And you'll have 2 models. A static one that with 2 hair meshes( one flipped and another one unflipped) and one rigged model ( with only one hair mesh). Select the rigged one you just imported, click on editable mesh and vertex.You'll see all those blue dots:
Press crtl+a to select all dots, they'll become red as you can see bellow:
Next,click on "attach"
After that click on your static model . A new window will pop up: Select the first option again "Match Material IDs to Material" and click on ok
After click on ok, press the "delete" key on your keyboard . It'll deleted the old rigged model and will keep the new rigged one( this new one rigged is your old static model). You'll see only blue dots like in ths picture:
Now deselect the vertex and click on editable mesh. You model is done and we need to export it.Be sure to mark "skip col" before export it and click on bone/skin export. I replaced the older model i had( in this case bmost) as you can see bellow
Now that you exported your model, you need to make some changes on your txd file. This is the second most important part to fix the alpha bug. Your hair texture needs to be the last one in your txd file.Import all textures , except the hair one.Check this pic to see my txd file with all textures except the hair. Yours should look like this:
Select the last one and press "crtl + insert". You'll make a copy of the last one as you can see:
Double click on it and you'll see the image properties, rename it to match your hair texture and compressed it.This will make it as a DXT1 layer.
Now mark that "alpha is used" option.The alpha name will appear there automatically. It's basically your texture name with an letter "a" in the end.
After that , click ok and you'll have a new image there with "hair" name on it plus the alpha channel
Click on "import" button and you'll have a browser. Search your proper hair texture and open it.
Ok , now you have everything done and fixed. Basically what we have done was leave the hair texture be the last one in the model hierarchy and the hair texture the last one in the txd file too. Since GTA engine renders complex alpha channel for the last, everything works fine to render it properly
In this tutorial, we double the meshes ( for hairs, beards etc) to get it working good since SA can't handle double faced polygons. So doing tihs trick both side of the mesh will be rendered without bugs. Plus using the right settings on TXD file, you'll make the result even better.
sexta-feira, 29 de abril de 2011
Easiest,Simplest and Detailed Tutorial For SA
Hello guys, many people have asked me how i convert model from gta san andreas as ped!
So i decided to make this tutorial!So lets go!
First, you need the model you want to convert, 3ds max and Kams inscript installed!
Run 3ds max and click on import...

Click on all files

Select the model you want to convert and click open (in my case, a.3ds)

You have the model imported!

Now press M on your Keyboard, you'll see this new window

Take the textur file from your model

drag and drop it on the first square

Repeat untill you get all the textures file from yout model on those squares

click on the + (on the left side of editable mesh) and select element

scroll down util u see the Material tab!

click on the that space and select the first option

Now click on the square which you droped the texture from that part of the body,after that,
click on assign...

repeat it untill you get our model completely textured

click on Element again, to leave this tab

click on utilities tab, scroll up and click on the letter A,click on import DFF next

On that new window, select DFF file from a Original ped and click open

Now you have 2 models, the one you want to convert(textured) and the one from san andres with bones

Now move your model to the same position of the SA Model In my case, the model is smaller than the original one from sA,
so i need to resize it to fit it

Now it's on the same position but the arms are out of place

SO, select the arm's bone from SA original ped

and rotate it ultill you get it on the same position!

Now it's "perfect"

Select sA model ped and click on the utilities tab,dff io, select "skip Col" and click on Bone/skin export

Select any name you want to save the dff, i chose test

Now delet the original ped mesh

Select the bones and delet them all

You see only your model, go to utilities tab again, click on Dff io,click on A again and import dff

select the file you created before

Now you see the model you want to convert and the original one from san andreas but in this time, it's on the same position!

Select SA original model, click on + (on the left side of editable mesh)

click on vertex and you get this warning message, click on yes

Now you see many blue dots

Press Crtl+A on your keyboard to select all of those dots and they turn red.

Scroll until you see "Attach" and click on

Now click into your model and this window appears,select the first option and click ok

now you see many dots, red and blue.

Press delete on your keyboard and the red dots are gone!

Click on vertex again to leave this option.

Now you have successfully rigged your ped but probably, it will have some bugs. Lets check it, Select the arm's bone:

now rotate it, and you see some bugs on the body

Select your mesh, click on +(on the left side of SKIN) than click on Envelope and Select "Vertices"

in my case the bug is located on the chest so i select spine 1. You select the part of you model which you see thebugs!

Scroll down and you see "Weight Properties"

Now select the dots that you saw the bugs

after that, select rigid and type 1,0 on Abs Effect

repeat it on others parts of the model select the spots

and do it again, (select rigid and type 1,0 on Abs Effect)

On the Top of the window,Click on SKin again and you got it deselected.

now select the bone again and rotate to see the result

you got it fixed, without bugs!
SO click on utilities tab again, Dff io, now select Skip col and click on Bone/skin Export

Now get one txd file, and import your textures, don't forget to rename it to the exaclty name that you used before import them into 3dsmax!
Crongats Conrade xD
So i decided to make this tutorial!So lets go!
First, you need the model you want to convert, 3ds max and Kams inscript installed!
Run 3ds max and click on import...
Click on all files
Select the model you want to convert and click open (in my case, a.3ds)
You have the model imported!
Now press M on your Keyboard, you'll see this new window
Take the textur file from your model
drag and drop it on the first square
Repeat untill you get all the textures file from yout model on those squares
click on the + (on the left side of editable mesh) and select element
scroll down util u see the Material tab!
click on the that space and select the first option
Now click on the square which you droped the texture from that part of the body,after that,
click on assign...
repeat it untill you get our model completely textured
click on Element again, to leave this tab
click on utilities tab, scroll up and click on the letter A,click on import DFF next
On that new window, select DFF file from a Original ped and click open
Now you have 2 models, the one you want to convert(textured) and the one from san andres with bones
Now move your model to the same position of the SA Model In my case, the model is smaller than the original one from sA,
so i need to resize it to fit it
Now it's on the same position but the arms are out of place
SO, select the arm's bone from SA original ped
and rotate it ultill you get it on the same position!
Now it's "perfect"
Select sA model ped and click on the utilities tab,dff io, select "skip Col" and click on Bone/skin export
Select any name you want to save the dff, i chose test
Now delet the original ped mesh
Select the bones and delet them all
You see only your model, go to utilities tab again, click on Dff io,click on A again and import dff
select the file you created before
Now you see the model you want to convert and the original one from san andreas but in this time, it's on the same position!
Select SA original model, click on + (on the left side of editable mesh)
click on vertex and you get this warning message, click on yes
Now you see many blue dots
Press Crtl+A on your keyboard to select all of those dots and they turn red.
Scroll until you see "Attach" and click on
Now click into your model and this window appears,select the first option and click ok
now you see many dots, red and blue.
Press delete on your keyboard and the red dots are gone!
Click on vertex again to leave this option.
Now you have successfully rigged your ped but probably, it will have some bugs. Lets check it, Select the arm's bone:
now rotate it, and you see some bugs on the body
Select your mesh, click on +(on the left side of SKIN) than click on Envelope and Select "Vertices"
in my case the bug is located on the chest so i select spine 1. You select the part of you model which you see thebugs!
Scroll down and you see "Weight Properties"
Now select the dots that you saw the bugs
after that, select rigid and type 1,0 on Abs Effect
repeat it on others parts of the model select the spots
and do it again, (select rigid and type 1,0 on Abs Effect)
On the Top of the window,Click on SKin again and you got it deselected.
now select the bone again and rotate to see the result
you got it fixed, without bugs!
SO click on utilities tab again, Dff io, now select Skip col and click on Bone/skin Export
Now get one txd file, and import your textures, don't forget to rename it to the exaclty name that you used before import them into 3dsmax!
Crongats Conrade xD
Assinar:
Postagens (Atom)